MEXICAN QUINOA SKILLET

mardi 30 septembre 2014
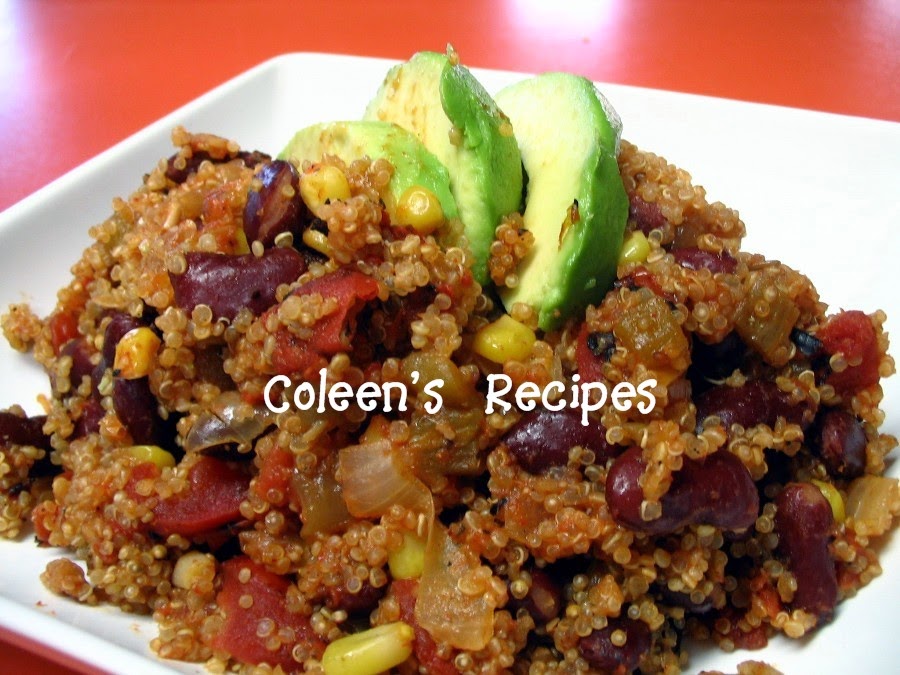
A friend of mine tipped me off to this fantastic recipe at http://damndelicious.net  It provides that COMFORT FOOD taste AND it is totally healthy for you (a rare combination)!! This recipe is super quick and easy to make!!  It is definitely going directly into my 5 star recipe box and I will be freezing single portions of it for my busy day quick hot lunch!!


In a large skillet place:
1 tablespoon olive oil  (I use canola oil)
2 cloves garlic minced
1 seeded and chopped jalapeno (see note below)
1/2 cup chopped sweet onion  (my tweak)
Saute for a couple of minutes or until the onion starts to smell sweet, then add:
1 cup quinoa
15 ounce can drained black beans (I use kidney beans)
1 cup vegetable broth
14.5 ounce can fire roasted tomatoes
1 cup corn  (I used frozen)
1 teaspoon chili powder
1/2 teaspoon ground cumin
1/2 teaspoon salt
1/4 teaspoon black pepper
4 ounce can diced mild green chiles (my tweak)

Stir well, and bring to a boil. Lower heat and put the lid on and cook for 20 minutes.  After 20 minutes:

Turn off the heat and add:
1 peeled and diced avocado
Juice of 1 lime  (I left this out)
2 tablespoons chopped fresh cilantro (I left this out)

Toss and serve immediately.


NOTE: I left out the jalapeno because I'm a little shy on spice-heat. I substituted a 4 ounce can of diced mild green chiles...it was perfect and full flavored. If you like a little heat with food, by all means include the mild green chiles AND the jalapeno pepper.

NOTE: Quinoa is a high protein grain that is VERY healthy for you and is an excellent addition to anyone dealing with diabetic issues.

HOMEMADE VANILLA EXTRACT

mardi 23 septembre 2014
The Halloween/Thanksgiving/Christmas baking season is just around the corner and I decided to stock the pantry with baking supplies.  Well, I was shocked at the increased price of good quality vanilla; some of it is as high as $15 for just a few ounces!!

With that in mind, I decided to make my own vanilla, although I had NO CLUE how to do it. After some Internet research, I was thrilled to learn that the process was SUPER EASY and only takes TWO ingredients (vodka and vanilla beans)!!


At first I was concerned because vanilla beans are not always in my budget. I like McCormick brand spices, but their price for TWO vanilla beans is over $10!! Homemade vanilla extract would be outrageously expensive at those prices, so back to the Internet.

I discovered that the best vanilla extracts are NOT made out of the same kind of vanilla beans that you bake with (whew!! That was a relief.). Vanilla extract is made with Grade B vanilla extract beans (I didn't even know there was such a thing). Google it and you will find a lot of places to buy them. Just make sure they are labeled MADAGASCAR BOURBON EXTRACT GRADE B VANILLA BEANS.

The 6" beans aren't very pretty to look at (they aren't plump and supple and you CAN NOT bake with them), but they make GREAT extract. When you order them, they will arrive looking like this:
Supplies
1 quart of vodka  (see note)
4 ounces of Madagascar  Grade B extract vanilla beans

This makes a LOT of vanilla, but I have in mind to put it in pretty little bottles and tuck it into holiday gift baskets, so a quart of extract is a good thing.

TIPS: 
Don't waste your money on expensive vodka, thinking that this will make better vanilla...it does not.  Good news!! The cheapest vodka works just as well as expensive vodka for this project!!

You will need a jar that is a bit bigger than a quart since the vodka AND vanilla beans have to fit in it (I learned that the hard way).

Cut the grade B extract vanilla beans into 1/2" pieces and put them into the quart of vodka..........that's it!!  Now all you have to do is shake the bottle a little (every few days) and after a month, it will be extract!! What could be easier?

Before using the extract (or giving it away), strain the spent vanilla bean pieces out of the extract. If you don't want ANY vanilla seeds in the extract, run the finished product through a coffee filter.


Decorative bottles like this are available online for about $2.50 each, they would make a pretty gift.

This extract will be good forever, or until the very last drop. No need to refrigerate it.


This photo is only 2 weeks into the extract process
(see how rich it looks already?)
For those of you who are concerned that homemade vanilla
is not as "strong" as commercial vanilla...never fear!!
This homemade vanilla is very potent (in a good way) and
you will LOVE it!!
 
ENJOY!!!

GRANDMA's BREAD AND BUTTER PICKLES

mercredi 17 septembre 2014
When I was a little girl I watched my (very German) Aunt Welentina Ezlinger make pickles in her basement. I climbed up on a stool and watched her line up the hot jars and put "seeds" in each one. She then packed the jars tight with cucumbers from her garden and poured a hot vinegar liquid over them. That was almost 60 years ago, but I remember it like it was yesterday. I was so impressed!! I think of her when I make this recipe.

We love these bread and butter pickles!! They are fresh and bright tasting and are worlds better than commercial pickles!!


GRANDMA's BREAD AND BUTTER PICKLES        6 PINTS
 
4 cups water
1/4  cup pickling salt (not regular salt)
10 large pickling cucumbers
ice cubes (I use 2 trays of ice cubes)
3 cups sugar
2 cups water
2 cups apple cider vinegar
2 teaspoons ground turmeric
2 teaspoons mustard seed
1/2 teaspoon celery seed
 
Wash the pickling cucumbers and slice them into 1/8" slices (I cut mine just a tad thicker than 1/8").
 
 
In a LARGE bowl, mix 4 cups water and 1/4 cup pickling salt until well dissolved. Add cucumbers and ice cubes and gently swirl, making sure the slices are all submerged.  Let cucumber slices soak for two hours.
 
After 2 hours, drain the cucumbers (throw away the liquid) and rinse completely with fresh water (I rinse mine 2 or 3 times).
 
In a large/deep pan, mix 3 cups sugar, 2 cups water, 2 cups apple cider vinegar, 2 teaspoons ground turmeric, 2 teaspoons mustard seed and 1/2 teaspoon celery seed. Bring this mixture to a boil.
 
Reduce heat to LOW and put the cucumber slices in. Stir gently and let the cucumber sit in the hot liquid until they are all hot (but not cooked). Don't let the cucumbers boil.
 
Remove the slices from the hot liquid (with tongs) and pack directly into sterilized PINT size mason jars (pack as many as you can get into the jars...pack tightly).
 
When the jars are all packed with cucumber slices, bring the pot of vinegar liquid back to a boil. Remove from the heat and pour into the jars of cucumber slices, to within 1/4" of the top. Run a CLEAN knife around the sides of the jars to remove any air bubbles.
 
Wipe off the rims of the jars with a clean moist towel and screw on the two piece lids.
 
If you are going to use these pickles within 2-3 months, you can just keep them in the fridge at this stage.  If you want to keep them for a lot longer or if you want to store them in the pantry, you'll have to process the PINTS immediately in a hot water bath for 10 minutes.
 
Whether you keep them in the fridge, or put them through a hot water bath, you will have to let the cucumbers "pickle" for 2 or 3 weeks before you eat them, gently "shaking" the jars once a day.


ENJOY !!


SOFT COCONUT DROP COOKIES

dimanche 14 septembre 2014
These cookies are WONDERFULLY SOFT, rich, flavorful and easy to make. The recipe makes about 3 dozen big 4" cookies and if you store them in an airtight container, they will stay soft and chewy (they are totally addicting!!)

 
Soft Coconut Drop Cookies are PERFECT lunch box cookies, bake sale cookies, potluck cookies or "anytime cookies". They are delicious.

1 cup butter flavored shortening
1 cup sugar
1 cup brown sugar
2 eggs
1 teaspoon vanilla extract
2 cups flour
2 cups old fashioned oats
1 teaspoon baking powder
1 teaspoon baking soda
1/2 teaspoon salt
2 cups sweetened flaked coconut (lightly packed)
1 cup finely chopped pecans (optional)

Cream the shortening, sugars and vanilla until light and fluffy. Add eggs one at a time, beating in between each egg.

Add the flour, oats, baking powder, baking soda, coconut and nuts (if you are using nuts) and beat until well mixed (batter will be thick).

Take a well rounded tablespoon of cookie dough batter and roll it into a ball. Place on a greased cookie sheet spaced 3" apart (I use parchment paper instead of greasing the pan). Bake at 350° for 11-14 minutes (my electric oven takes a full 14 minutes). Leave the cookies on the cookie sheet a minute or two before you remove them.

After they are cooled, store the cookies in an airtight container.

 
ENJOY !!
 
Note: Recipe calls for butter flavored shortening (I use butter flavored Crisco). I'm sure they could be made with butter instead, but they will bake differently and probably spread out a lot more. I also don't think they would stay soft and chewy.


TOMATO VEGGIE SOUP

mercredi 10 septembre 2014
We have already had frost a few times this fall and the yellow leaves are starting to fall; that means its SOUP time!! This recipe is a wonderful use for all of those extra garden veggies you have this time of year. Tomatoes, zucchini, carrots, onions, celery and anything else you can think of to add to the soup; this recipe is very versatile (and yummy).


1 cup chopped onions
1 cup chopped celery
1 cup chopped carrots
2 teaspoons minced garlic
2 1/2 cups water
2 large tomatoes (I used a ton of cherry tomatoes)
1 (15 ounce) can ro-tel tomatoes with juice (I use mild)
4 cups beef  or vegetable broth  (not bullion)
1/3 cup uncooked barley
1/4-1/2 teaspoon black pepper (I like 1/2 teaspoon)
2 cups chopped zucchini
1 can rinsed and drained kidney beans (or your favorite bean)
pinch of red pepper flakes if you like heat (optional)

Spray a large soup pot with vegetable spray and sauté the onions, celery and carrots until the onions turn soft and a little sweet.

Put the undrained can of rotel tomatoes


PLUS the two fresh tomatoes into the food processor and blend until smooth, then add to the pot.

Add everything else to the pot and simmer SLOWLY for 45 minutes, that's it; just stir it once in a while.

I'm SURE this could be easily done in the crockpot as well.


ENJOY !!

EASY OVEN BROWN RICE

samedi 6 septembre 2014
We've been trying to eat healthier lately, and "nutrition empty" white rice has been replaced by brown rice at our house.

Before now, I have only had moderate luck making brown rice. Not only do you have to babysit brown rice on a burner for 40-ish minutes, but the end result can be a little crunchy, (or worse yet), it can be gummy and sticky. Then, of course, there is the dreaded layer of rice that always cements itself to the  bottom of the pan (insert frown here).... not fun!!

Well, my cooking friends, your brown rice "issues" are over!! This super easy method will give you fluffy brown rice every time (with every grain cooked) and NOTHING sticks to the pan....super easy!!


This recipe makes three cups of cooked rice, which is a lot of rice for smaller families. So, I divide the leftovers into 1/2 cup or 1 cup portions and I freeze it. This way you can have brown rice ready in a flash for a weeknight meal (or to add to soups, etc.)

1 1/2 cups brown rice
2 1/2 cups boiling water
1 tablespoon unsalted butter 
1 teaspoon kosher salt (optional)

Preheat your oven to 375° and spray an 8" x 8" baking dish with vegetable spray.

Put the dry rice in the prepared baking pan.  Heat the water, butter and salt until it just comes to a boil, then pour over the rice and stir everything just enough to get the rice to an even level in the pan. Then cover the pan with aluminum foil.

COVER PAN TIGHTLY

I use heavy duty aluminum foil and crimp the edges tight on all four sides. It is important that you trap the steam in the pan.

Bake at 375° for one hour. After an hour, remove the pan from the oven and take off the foil. Fluff the rice with a fork and that's it!!


If you aren't going to eat the rice as soon as it comes out of the oven, make sure you still remove the foil so that the condensation doesn't drip back into the rice.

ENJOY !!

PERFECT BLUEBERRY CREAM MUFFINS

mercredi 3 septembre 2014

This muffin is sweet, moist, light, full of flavor and pretty to look at (I love muffins than have nice rounded tops). They are very quick and easy to make and they freeze well; what more can you ask for?


BLUEBERRY CREAM MUFFINS       MAKES 24

3 large eggs
1 + 1/2 cups sugar
3/4 cup vegetable oil
1 teaspoon vanilla extract
3 cups flour
3/4 teaspoon salt
3/4 teaspoon baking soda
1 + 1/2 cups sour cream
1 + 1/2 cups blueberries

In large bowl, beat the eggs and sugar until well combined. Leave mixer running and drizzle in the vegetable oil, stir in vanilla.

In another bowl, mix the flour, salt and baking soda. Add this dry mixture (to the egg mixture)alternately with the sour cream (I added it in thirds).

Gently fold in the blueberries.  Line cupcake pans with paper liners and fill about 3/4 full (I use an ice cream scoop). 

Bake in preheated 400° oven for 20 minutes (my electric oven takes 23 minutes).

* Adapted version of recipe found on Allrecipes.com
 

Yummy Food Recipe Copyright © 2011-2012 | Powered by Blogger